Do You Need to Wet the Fabric for Deco Art Chalk Paint
A basic guide to field paint testing
From the Resene paint and decorating problems solver
Resene has created this guide of how to test paints in the field. For technical assistance please use our Enquire a Pigment Good Service.
Basic on-site paint testing
The following exam methods are used to help establish/provide basic information, which can be useful in determining the electric current status of the applied paint arrangement and besides aid with advice for preparation and painting.
- Testing for Dirt and Oil Contamination
- Testing for Surface Chalking or Color Fade
- Surface Cleaning
- Solvent Testing for Paint Type
- Paint Adhesion
- Concrete Slab Dry Exam – Plastic Canvas
- Testing for a Concrete Curing Agent
Employ caution with regard to your safe when using abrupt knives and solvents and also utilize circumspection in determining the results gained from the bodily testing, as information technology is merely a basic guide.
Exam i – Testing for Dirt and Oil Contagion
Aim:
Establish the presence of dirts, greases, oil contamination.
Procedure:
Rub one spot back and along on the surface 10 times with a dry out cotton pad.
Estimation:
Black marks on cotton pad indicate dirts or oils etc. present. If test is positive, then clean the area with detergent, rinse with make clean water, dry and the repeat test to see if surface contamination is removed.
Examination 2 – Testing for Surface Chalk or Colour Fade
Aim:
To establish presence of surface chalking of paint.
Equipment Needed:
- Black textile
Procedure:
Rub one spot back and forth 10 times with the blackness cloth.
Interpretation:
White deposit on the cloth indicates surface chalk.
Experience will enable you to differentiate betwixt a light or heavily chalked surface.
Alkyd or epoxy based pigment coatings field of study to outside exposure are highly likely to give a positive test for chalking.
If no residue removed (seen on the cloth) then it is Colour Fade.
Test 3 – Surface Cleaning
Aim:
To clean the surface before carrying out additional testing.
Procedure:
Wet surface with detergent. Scrub surface with brush and so rinse with clean water. Wipe dry with rag.
Examination 4 – Solvent Testing for Pigment Type
Aim:
Use of solvents to differentiate generic paint types.
Equipment Needed:
- Safety spectacles and gloves (solvent resistant)
- Black rag (existing low-cal colour)
- White rag (existing night color)
- Methylated spirits
- Xylol (Xylene)
- MEK (Methyl Ethyl Ketone)
- Turps (mineral turpentine)
Process:
Wear safety glasses and gloves.
Make clean exam area past using Test three process – Cleaning Surface. Check for surface chalk using Examination 2, if positive then clean until a negative outcome is achieved.
Moisten an area of the test cloth, size of say a 50 cent slice with the test solvent. Hold moistened cloth onto test area for xxx seconds, then rub. Check cloth to run into if paint has been dissolved by solvent. Immediately later on removing fabric, rub the test area with your finger to determine if the pigment film is soft or sticky.
NOTE: Ensure the rag remains wet at all times with solvent during the examination.
Place test rag either in an outside bin or a sealed container for safe disposal later.
Interpretation:
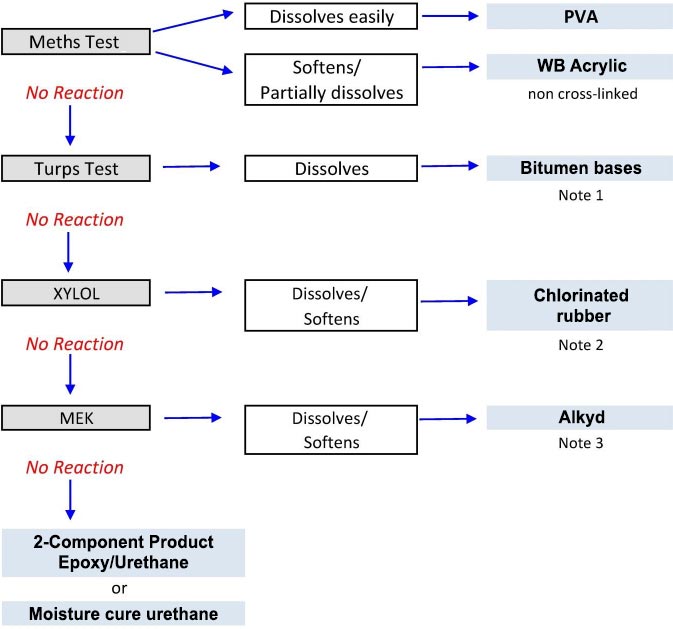
Annotation 1: Solventborne Clear Glaze (F10 Glaze), Cyclised rubber and Pliolite Coatings will also soften and deliquesce.
Note two: Acrylic based coatings are readily dissolved.
Note 3: Vinyls are also soluble and will dissolve. Fully cantankerous-linked (well cured) waterborne enamels e.g. Enamacryl, Lustacryl and SpaceCote may suffer gloss loss and some paint transfer just generally don't dissolve.
The degree of reaction not only varies with paint type (resin arrangement) but also gloss level and colour. The higher the gloss level the more resistant the pigment may be to the solvents being used. With stiff colours (high levels of colorant) there may be a degree of pigment transfer which may brand interpretation of softening/dissolution reaction more difficult.
Examination 5 – Paint Adhesion
Aim:
To establish the adhesion properties of the paint, be that to the substrate or to other layers within the blanket system.
Equipment Needed:
- Sharp pocketknife (snap off blade blazon)
- Wooden stick (cutting guide)
- Adhesion tape (Tesafix 4970 Record or similar*)
* Available on request from the Resene R&D Lab - Cleaning solution
- Fresh water
- Clean rag
Procedure:
Vesture rubber spectacles and gloves.
Clean test area past using Test 3 procedure – Cleaning Surface. Bank check for surface chalk using Exam 2, if positive then make clean until a negative result is achieved.
Using the Abrupt Knife and wooden stick as a guide, cut 6 vertical lines approximately 3mm autonomously, then echo the same 6 cuts horizontally across the vertical cuts already fabricated (run into below diagram).
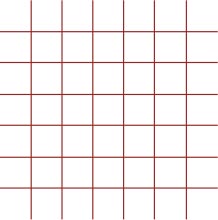
Place adhesion test tape over the filigree area and rub downwardly with curved blunt finish of pocketknife or stick. Leave the record fixed to the surface for ninety seconds and then pull off at a consequent medium speed at a 45° angle.
Note/s:
Fold over i end of the record to make a pull tab before placing tape onto the filigree. Do non bear on the sticky side of the record before placing it onto the grid. Repeat the procedure at a few unlike sites.
Estimation:
Poor adhesion of the paint system or layers inside it is seen when there is heavy paint removal along the edges of the cuts or when squares have been detached.
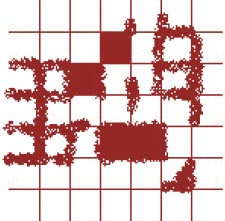
Effort to establish the failure signal i.eastward. If the substrate is exposed then failure is at the base of the pigment organization (substrate adhesion failure) and the recommendation would call for total removal back to bare substrate before painting.
If a failure inside the paint layer (inter-coat adhesion failure), and then where, i.e. at what colour is exposed and what colour is on the back of the removed paint?
A measure of the extent of failure tin be calculated using the following equation:
| % expanse of failure | = | Number* of flaked squares | x | 100 |
| 25 | ane |
* each square = 4% of the total surface area so one/2 a flaked square = 0.five
e.g. In the above instance you have 4 Squares failed, only y'all also have edge impairment to 4 additional squares, with say 0.25 (1%) each and you also have one foursquare with half missing so say 0.5 (2%)
... so 4 x 4 = 16% area + 4 10 1 = 4% area + 1 x 2 = 2% area = 22% area failure
... or using the equation 4 squares + 4 x 1/4 squares + 1/two foursquare =
five 1/2 x 100 / 25 = 22 and so a adhesion failure of 22% of the area
Note: Accept a photograph of the adhesion examination to proceed for your records or to use when consulting others for a second opinion.
Examination 6 – Concrete Slab Dry Test – Plastic Sheet
Aim:
To institute if physical flooring is dry plenty to be painted.
Equipment Needed:
- Plastic sheet 45 x 45cm
- Sealing tape (Duct tape)
Procedure:
Sweep test area to remove all loose surface contaminant/dirt and ensure a clear surface.
Lay the sheet downwardly and then seal the edges to the flooring by using the tape. Ensure a good seal and then leave for at least sixteen hours before then checking on the underside of the plastic canvas for moisture/water droplets or misting.
Estimation:
If no wet present after 16 hours then proceed with floor grooming and painting.
If moisture is present, then let more than time for the concrete slab to dry out, then repeat exam.
Note: Optimally new concrete slabs should be left for at to the lowest degree thirty days to cure and beginning to "dry out" earlier painting.
Refer to the Concrete BASICS – A Guide to Concrete Practice booklet for more information.
Test 7 – Testing for a Concrete Curing Agent
Aim:
To determine if the concrete slab has an applied curing membrane.
Equipment Needed:
- Water canteen
Process:
Sweep examination expanse to remove all loose surface contaminants/dirt and ensure a clear surface.
Splash the water onto the concrete.
Interpretation:
If the water is immediately absorbed and the physical darkens so in that location is no curing membrane present.
If not then grooming by diamond grinding must be undertaken to remove the membrane. Grinding must achieve a uniform surface texture like to 180 grit sandpaper.
June 2018
Disclaimer
The information contained in this printed media is not a specification, has been given in skillful faith and is to exist used as a guide but. It is designed to be used to help offer elementary guidelines to help identify potential problems and offer some resolution or solution to a particular trouble. Since atmospheric condition of use of this publication is beyond the control of the writer, information herein is without warranty, implied or otherwise, and last determination of the suitability of any information or material for the use contemplated, the manner of use is the sole responsibility of the user. This is not a definitive book or specification and must not be used so.
For technical assistance please use our Inquire a Paint Adept Service.
Resene Paint and Decorating Problems Solver
Larn more almost typical painting problems and situations you may find when decorating.
Problem solver topics Safety topics Inquire a Pigment Adept
Source: https://www.resene.co.nz/paint-testing.htm
0 Response to "Do You Need to Wet the Fabric for Deco Art Chalk Paint"
Post a Comment